Tasty Chef Kitchen Layout
Build a walking line the staff can finish without crossing themselves.
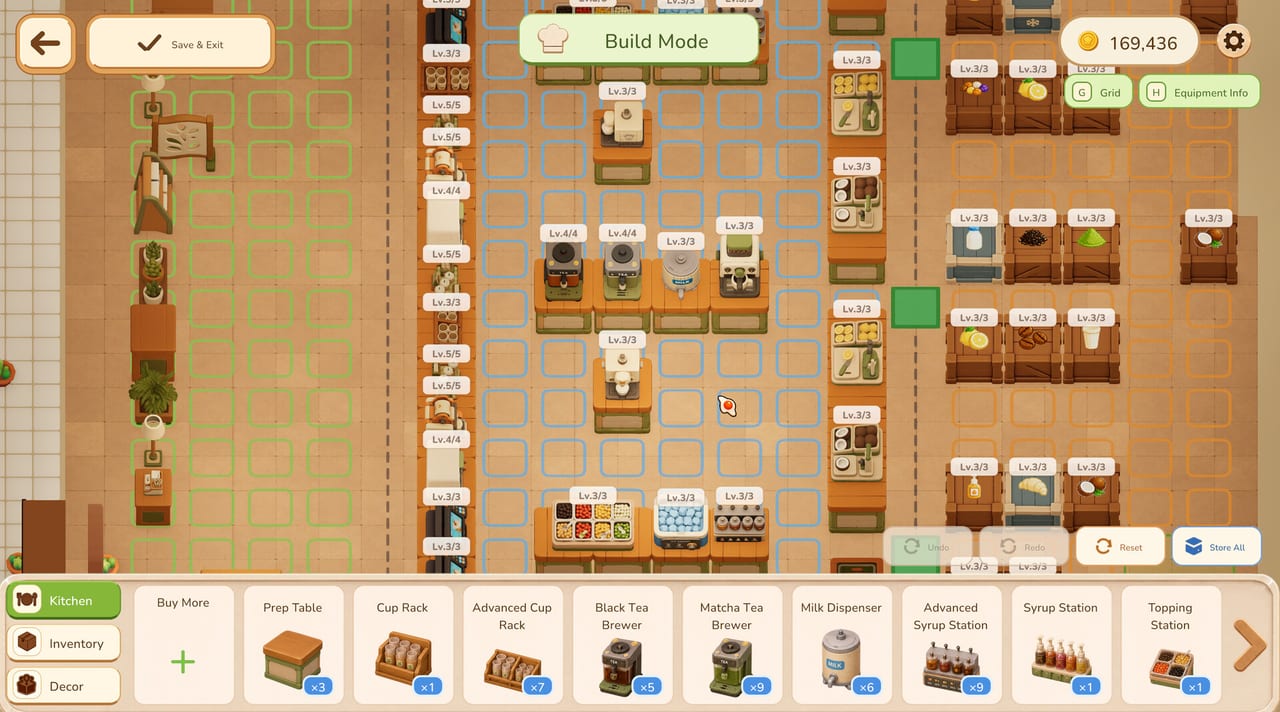
Layout is the silent skill in Tasty Chef. A good menu still fails if milk is twelve tiles from tea. This page is the Build Mode manual for the milk tea shop you can run now, plus a preview of sushi conveyor plans from official screenshots. Pair it with the kitchen flow planner when you are about to spend gold, and with how to play so you know which machines a ticket actually needs.
Enter Build Mode like a carpenter
From the idle hub, open Layout or Equipment. The top banner reads Build Mode. Turn Grid (G) on immediately. Turn Equipment Info (H) on so you can see machine levels. Work in this order:
- Draw the walking corridor in your head. One main aisle, not four dead ends.
- Place cup storage at the start of the aisle.
- Place brewers and milk in the middle.
- Place ice and toppings at the end, nearest the pass to customers.
- Line ingredient crates on the opposite wall so restockers do not cut through the brew line.
- Save & Exit. Start Service. Watch one ticket. If someone walks through a machine cluster, Undo and fix one tile, not ten.
Kitchen, Inventory, and Decor are separate tabs. Decor does not serve drinks. Inventory is crates and bulk. Kitchen is the tools. Buy More when you are missing a type, not when you are bored.
Milk tea machine catalogue (from official shots)
These names appear on the milk tea Build Mode bar:
- Prep Table
- Cup Rack / Advanced Cup Rack
- Black Tea Brewer
- Matcha Tea Brewer
- Milk Dispenser
- Syrup Station / Advanced Syrup Station
- Topping Station
Machines show upgrade levels such as Lv.3/3 or Lv.5/5. A higher level is not a reason to block the aisle. Two Lv.3 brewers on the walking line beat one maxed brewer behind a plant. Store All if you inherited a messy demo save. Reset if you want the original footprint back.
The corridor rule
Imagine the ticket as a sentence: cup, tea, milk, ice, topping, serve. The floor should read that sentence left-to-right or top-to-bottom. U-shaped lines work if the inside of the U is empty walking space. Islands of machines in the dining room look cute and then trap a beaver with a dying timer.
Staff pathing is not documented as a formula, but you can see the result. If Restock Supplies is on, crates must touch a clear wall. If Make & Serve is on, the employee must be able to walk the same corridor you walk. If Take Orders is on, leave a gap at the counter so greeters are not standing inside a cup rack. Duty design lives on hiring staff and the staff roles list.
Storage and stock alerts
Ingredient crates in screenshots hold coconuts, lemons, coffee beans, pastries, ice, and bottled extras. Counts such as 51/55 mean you are close to a cap, not that you are safe forever. Put high-use crates (tea, milk, ice) closest to the matching machine. Put coconut and lemon near the drinks that actually need them — Coconut Milk and Lemon Black Tea — or those drinks will punish a wide menu. The menu planner should shrink the menu until the crates match.
Stock Alert is a layout test. If the alert fires and the restocker has to cross three brewers, you failed the warehouse wall. Fix the wall, do not hire a faster rarity yet.
Sushi conveyor preview
Official sushi Build Mode shows a different kit:
- Empty Kitchen Counter
- Fish Processing Station
- Shrimp Peeling Station
- Preparation Station
- Rice Cooker
- Conveyor Belt
The belt loops around an inner work pit. Fish and rice stay inside. Plates travel the belt. Chairs sit on the outer edge. A warehouse zone (labelled storage in the shot) sits to the side, not inside the loop. Layout Plans can store more than one design — the screenshot shows Layout 1 Active. When sushi leaves “under construction” on your Tasty Town map, copy that pit-and-belt idea instead of stretching the milk tea corridor around a rice cooker. Restaurant types explains why the workflows differ.
Bakery remains under construction on the same map. Do not pre-place ovens in the tea shop “just in case.” Wrong tools in the wrong shop become walking rocks.
Co-op layout rules
Two humans need two widths. If friends are coming, read co-op and leave a passing lane. Assign one player to brew and one to ice/toppings so they are not click-fighting a single Matcha Tea Brewer. NPC restockers still need the wall. A four-body kitchen with a one-tile aisle is a cartoon pileup.
Gold discipline
Build Mode shows your gold in the corner. Extra Advanced Cup Racks are cheaper than a bad aisle. Spend on:
- One missing station type (no ice chest is a real emergency).
- A second brewer of the drink you actually sell.
- Cup capacity.
- Only then cosmetics in Decor or outfits at the Style Boutique.
Town Bank converts gold and town funds later. It will not save a shift that cannot find milk. Getting started has the first-purchase list if you are still on day one.
A 15-minute remodel drill
End Shift. Open Build Mode. Grid on. Store All on the worst cluster. Place cups → tea → milk → ice → toppings in a straight line. Crates on the back wall. Save. Start Service. Serve five tickets without crossing the line. If you crossed, you are not done. That drill is the entire layout skill. The kitchen flow planner is the same drill on paper.
Frequently Asked Questions
Quick answers for milk tea shifts, staff, and the September 2026 launch.
How do I open Build Mode in Tasty Chef?
From the idle hub, use Layout or Equipment. The banner reads Build Mode. Turn on Grid with G.
What is the best milk tea layout?
A single corridor: cups, tea, milk, ice, toppings, then serve. Crates on the back wall for restockers.
Should I copy the sushi belt into the tea shop?
No. Conveyor equipment belongs to the sushi restaurant. Milk tea wants a straight brew line.
Why do staff walk into each other?
The aisle is too thin or duties overlap on one machine. Widen the path and split brew versus ice, as in co-op.